Selecting the data type to edit
Use a track’s Edit Filter control to specify the type of data you want to edit.
Figure 124. Use the Edit Filter control to specify what type of data the global tools should operate on.
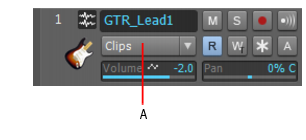
A. Edit Filter
The following data types can be selected:

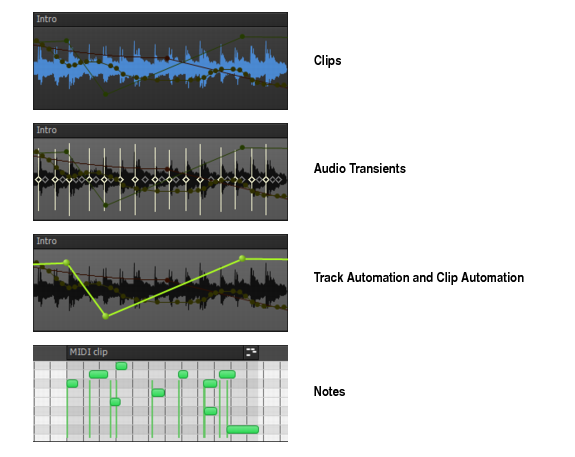
Clips. The selected tool operates on clips.
Audio Transients. The selected tool operates on audio transients (only available for audio tracks).
Notes. The selected tool operates on MIDI Note events (only available for MIDI and Instrument tracks).
Track Automation. The selected tool operates on track automation envelopes, including ProChannel, Arpeggiator, plug-in parameters and MIDI continuous controllers (CCs). Select the desired automation parameter from the submenu. Color-coded squares and bold text are used to indicate existing envelopes.
Clip Automation. The selected tool operates on clip automation envelopes. Select the desired automation parameter from the submenu. Color-coded squares and bold text are used to indicate existing envelopes.
To change the current Edit Filter setting
Do one of the following:
Click the Edit Filter control and select the desired data type. The Edit Filter control is available in each track strip in the Track view and in the Tools HUD (see
Using the Tools HUD to select tools).
Hold down the SHIFT key and click the clip or envelope you want to edit.
Hold down the SHIFT key and click an automatable control (Volume, Pan, etc.) in a track strip.
Hold down the SHIFT key and right-click to toggle between the two most recently selected data types.
Click the middle mouse button to show the Tools HUD, then scroll the mouse wheel to cycle through the available data types.

Tip: To set all tracks to the same Edit Filter setting, hold down the CTRL key when you change any non-selected track’s Edit Filter setting. To set all selected tracks to the same Edit Filter setting, hold down the CTRL when you change any selected track’s Edit Filter setting.
Tip: You can quickly toggle between Track Volume and the last/previously shown data type on the current track. To do so, press the PLUS (+/=) key. This only works on the current parent track, not in Automation lanes.
To toggle between the two most recent Edit Filter settings, hold down the SHIFT key and right-click in the Clips pane.
Data type ghosting
Although you can only edit one data type at a time, you can choose to always show clips and automation envelopes simultaneously. All but the selected data type will be shaded, or “ghosted”. This allows you to see all data types in context while editing a specific data type.
You can also hold down the SHIFT key and click any ghosted object to switch a track’s current Edit Filter setting. This is a quick way to toggle between editing clips and automation envelopes.
Figure 125. Use the Edit Filter control to specify what type of data the global tools should operate on.
To enable/disable data type ghosting
Click the Track view Views menu, point to Display and choose Display Ghosted Data on the submenu.
To switch between editing clips and automation envelopes
Hold down the SHIFT key and click the clip or envelope you want to edit.