dotonemanband
Max Output Level: -87 dBFS

- Total Posts : 167
- Joined: 2012/05/27 18:17:21
- Location: Brantford Ontario Canada
- Status: offline
Fade Out
I'm trying to fade out tracks at the end of a song. I've selected and highlighted four measures on one single track. I then choose Process - Apply Effect - Fade/Envelope. Problem is when I go to the Fade/Envelope step the option is not highlighted for me to click. That's where I'm stumped and the project's on hold. I know it's something I'm overlooking because yesterday I was able to go beyond that point and get to the graph that allows the options of different fades. Just not sure what I'm overlooking today. Suggestions pls.
|
doncolga
Max Output Level: -60 dBFS

- Total Posts : 1519
- Joined: 2006/01/03 17:15:48
- Location: Statesboro, GA USA
- Status: offline
I did this for the very first time today myself. Go to the Master track in track view and hover over the Edit Filter menu. Drop that down and select Automation, then Bus Output Volume. Use the Smart Tool to add nodes then move those around to adjust your fade at the end. This is what I did and it worked perfect. Good luck.
Donny
HP Z220 Workstation I7 3770, 8 GB RAM, Windows 10, Sonar Platinum, RME Multiface II via PCIe, JBL 4326 w/sub, AvanTone MixCubes
|
scook
Forum Host

- Total Posts : 24146
- Joined: 2005/07/27 13:43:57
- Location: TX
- Status: offline
Yes, volume envelops on tracks and buses are a more flexible, nondestructive way to perform the fade out.
|
John
Forum Host
- Total Posts : 30467
- Joined: 2003/11/06 11:53:17
- Status: offline
I use the fade at the end of a track. The upper right corner has the fade hot spot. By holding ctrl you can apply fades to all tracks.
|
ltb
Max Output Level: -48 dBFS

- Total Posts : 2707
- Joined: 2005/06/19 13:34:08
- Status: offline
Because it affects how buss comps & limiting responds I use a fade curve during the mastering stage, not pre-mixdown for song fade out. If various track fades are desired I'll use any of the others types mentioned, depending on what type of fx's are used. I.E. sometimes I'll want to fade the dry but have reverb remain by using a fade out curve on the audio clip itself, (switching the reverb send to pre..)
post edited by carl - 2013/07/27 15:03:58
|
dotonemanband
Max Output Level: -87 dBFS
- Total Posts : 167
- Joined: 2012/05/27 18:17:21
- Location: Brantford Ontario Canada
- Status: offline
Thanks for the help. First step I tried was with advice from Donny C. and that worked for the most part. The project I'm doing is part midi track and part audio. All the midi tracks did fade right away (holding ctrl) although the audio did not. So I went to the audio tracks separately and did a fade and tweak and I can stop cursing now. Thanks to Scook and John as well... I can carry on....
|
dotonemanband
Max Output Level: -87 dBFS
- Total Posts : 167
- Joined: 2012/05/27 18:17:21
- Location: Brantford Ontario Canada
- Status: offline
One other item. My project ends at measure 107 (3:21) and yet the marker continues to about measure 115 (3:38). How do I delete these measures and dead air so that it stops at 107 (3:21)? I tried highlighting and deleting at the end but it won't let me....
|
SteveStrummerUK
Max Output Level: 0 dBFS

- Total Posts : 31112
- Joined: 2006/10/28 10:53:48
- Location: Worcester, England.
- Status: offline
Hi Jeff
I'm guessing that there must be something out there at measure 115.
To quickly find the last event in your project, in the Track View select Ctrl+End.
If there is something out there, even an unused MIDI note, SONAR will include it as part of the project. To be sure of removing whatever is there, try selecting the measures you want to remove again, but this time select Edit>Delete Special and check all the options available, as well as 'Delete Hole'.
To see if that's cured your problem, place the Now Time back inside the project somewhere and hit Ctrl+End again.
|
dotonemanband
Max Output Level: -87 dBFS
- Total Posts : 167
- Joined: 2012/05/27 18:17:21
- Location: Brantford Ontario Canada
- Status: offline
Steve, I tried that suggestion, when I highlight the measures and go to Edit, the delete special and delete option won't highlite for me to click. I'll keep at it... thanks
|
dotonemanband
Max Output Level: -87 dBFS
- Total Posts : 167
- Joined: 2012/05/27 18:17:21
- Location: Brantford Ontario Canada
- Status: offline
Steve, found the problem, I first thought it might be in the master area where I faded out. After messing around with that idea a bit, there was a track showing a midi note at measure 115 (which wasn't showing before for some reason) but at least I've solved it thru trial and error (luck too)...again thanks for your help...
|
scook
Forum Host
- Total Posts : 24146
- Joined: 2005/07/27 13:43:57
- Location: TX
- Status: offline
It is really not more that a small annoyance. Specify time range, after selecting tracks, before exporting and the exported file will start and stop exactly where you want.
|
SteveStrummerUK
Max Output Level: 0 dBFS
- Total Posts : 31112
- Joined: 2006/10/28 10:53:48
- Location: Worcester, England.
- Status: offline
Edit - I forgot to refresh the page before replying  Glad you got it sorted.
post edited by SteveStrummerUK - 2013/07/27 17:50:16
|
konradh
Max Output Level: -42 dBFS

- Total Posts : 3325
- Joined: 2006/01/16 16:07:06
- Status: offline
I just Write Enable Master and pull the fader down. You can always turn Read off.
Konrad Current album and more: http://www.themightykonrad.com/ Sonar X1d Producer. V-Studio 700. PC: Intel i7 CPU 3.07GHz, 12 GB RAM. Win 7 64-bit. RealGuitar, RealStrat, RealLPC, Ivory II, Vienna Symphonic, Hollywood Strings, Electr6ity, Acoustic Legends, FabFour, Scarbee Rick/J-Bass/P-Bass, Kontakt 5. NI Session Guitar. Boldersounds, Noisefirm. EZ Drummer 2. EZ Mix. Melodyne Assist. Guitar Rig 4. Tyros 2, JV-1080, Kurzweil PC2R, TC Helicon VoiceWorks+. Rode NT2a, EV RE20. Presonus Eureka. Rokit 6s.
|
dotonemanband
Max Output Level: -87 dBFS
- Total Posts : 167
- Joined: 2012/05/27 18:17:21
- Location: Brantford Ontario Canada
- Status: offline
Thanks for the advice everyone, It's great to be able to come to the forum for solutions to my sonar challenges....
|
gswitz
Max Output Level: -18.5 dBFS

- Total Posts : 5694
- Joined: 2007/06/16 07:17:14
- Location: Richmond Virginia USA
- Status: offline
I set the fade clips to a key stroke... - I bounce my master bust to a track so I can see the wave form before exporting.
- I solo the new track and ensure it is routed directly to my interface (not the master bus with fx on it).
- I select the clip and hit ctrl+shift+e (you can find fade clips under the clips menu) and it brings up the fade clips window.
- I usually just set it to 500 ms or something. It doesn't matter at this point, it just makes it easier to grab the hotspots for me.
- Then I turn on snap and drag the start of the track to a zero crossing and then switch snap off and move the fade in hot spot to where I want it, auditioning the track.
- Then I go to the end of the clip and drag it to a 0 crossing too, using snap to as well. I hit N to turn off snap move the fade out start hotspot to where I want it and audition.
- Then, I hit shift+g to go to the beginning selected clip and listen to it.
:-)
StudioCat > I use Windows 10 and Sonar Platinum. I have a touch screen. I make some videos. This one shows how to do a physical loopback on the RME UCX to get many more equalizer nodes.
|
doncolga
Max Output Level: -60 dBFS
- Total Posts : 1519
- Joined: 2006/01/03 17:15:48
- Location: Statesboro, GA USA
- Status: offline
gswitz
I set the fade clips to a key stroke...
- I bounce my master bust to a track so I can see the wave form before exporting.
How exactly do you do that?..I'd like to give that a try. Thanks, Donny
HP Z220 Workstation I7 3770, 8 GB RAM, Windows 10, Sonar Platinum, RME Multiface II via PCIe, JBL 4326 w/sub, AvanTone MixCubes
|
gswitz
Max Output Level: -18.5 dBFS
- Total Posts : 5694
- Joined: 2007/06/16 07:17:14
- Location: Richmond Virginia USA
- Status: offline
Donny... haha... I presume you know how to bounce to tracks... so you must be asking about how to set fade clips to a key stroke...
This is actually in preferences ... I'm at the beach with my linux computer, so I can't look it up in Sonar, but there is a section for assigning hot keys. You click in the box and hit the key chord you want -- like ctrl+shift+e then to the right, you select the category (like clip functions) and the type in the search box and it shows up. then you click the bind button and it binds the shortcut to the key stroke.
is that what you wanted to know? :-)
StudioCat > I use Windows 10 and Sonar Platinum. I have a touch screen. I make some videos. This one shows how to do a physical loopback on the RME UCX to get many more equalizer nodes.
|
AT
Max Output Level: 0 dBFS
- Total Posts : 10654
- Joined: 2004/01/09 10:42:46
- Location: TeXaS
- Status: offline
I do fades in the mastering part of the exercise.
https://soundcloud.com/a-pleasure-dome
http://www.bnoir-film.com/ there came forth little children out of the city, and mocked him, and said unto him, Go up, thou bald head; go up, thou bald head. 24 And he turned back, and looked on them, and cursed them in the name of the Lord. And there came forth two she bears out of the wood, and tare forty and two children of them.
|
doncolga
Max Output Level: -60 dBFS
- Total Posts : 1519
- Joined: 2006/01/03 17:15:48
- Location: Statesboro, GA USA
- Status: offline
gswitz
Donny... haha... I presume you know how to bounce to tracks... so you must be asking about how to set fade clips to a key stroke...
I've had Cakewalk since Cakewalk Pro Audio around 1999 or so and I actually I had to look up bouncing...I've never done that before. LOL! It did work though and I'll try the other suggestions as well. 
HP Z220 Workstation I7 3770, 8 GB RAM, Windows 10, Sonar Platinum, RME Multiface II via PCIe, JBL 4326 w/sub, AvanTone MixCubes
|
SteveStrummerUK
Max Output Level: 0 dBFS
- Total Posts : 31112
- Joined: 2006/10/28 10:53:48
- Location: Worcester, England.
- Status: offline

gswitz
I set the fade clips to a key stroke...
- I bounce my master bust to a track so I can see the wave form before exporting.
- I solo the new track and ensure it is routed directly to my interface (not the master bus with fx on it).
- I select the clip and hit ctrl+shift+e (you can find fade clips under the clips menu) and it brings up the fade clips window.
- I usually just set it to 500 ms or something. It doesn't matter at this point, it just makes it easier to grab the hotspots for me.
- Then I turn on snap and drag the start of the track to a zero crossing and then switch snap off and move the fade in hot spot to where I want it, auditioning the track.
- Then I go to the end of the clip and drag it to a 0 crossing too, using snap to as well. I hit N to turn off snap move the fade out start hotspot to where I want it and audition.
- Then, I hit shift+g to go to the beginning selected clip and listen to it.
:-)
Hi Geoff It's always fascinating to see how different folk approach similar tasks, but I think there might be an easier and quicker way to accomplish this. First off, if you need to see the 'master' waveform, just turn on Waveform Preview on your Master Bus. I have this switched on permanently in my Master Bus, but you can switch it on and just play the last few measures of your song if you need a visual cue to decide where to start and end the fade out.  Then insert a Bus Output Volume automation envelope to the Master Bus, add a node where you want the fade to start and another where you want the fade to end. The usual fade options (Linear/Fast Curve/Slow Curve) are available if you right click on the envelope, plus, of course, for even more control, you can add more nodes in the fade section. I open the separate Automation Lane to edit the envelope, as it's easier to see separately with Waveform Preview switched on.  Alternatively, you could do as Konrad suggests and create the fade envelope on the fly by switching on Automation Write and dragging down the Master Bus's fader as the song ends (the nodes created by this process will still be editable).
|
gswitz
Max Output Level: -18.5 dBFS
- Total Posts : 5694
- Joined: 2007/06/16 07:17:14
- Location: Richmond Virginia USA
- Status: offline
Steve Strummer, that was an awesome and generous post. I really appreciate the effort you put into it. Bus Master and PreMaster Wave formsI am aware of the wave preview and have used it for years to watch for clips in the master during mix. I actually send to a 'Pre-Master' bus so I can get a wave form before the master bus FX and then also the wave form after the master bus FX so I can watch for clipping pre-master. The wave form image before master fx helps me keep the levels from my tracks reasonably hot -- safely hot. Pro Channel Clip Lights WishSince the Pro Channel has a clip indicator, I wish we could get a mark in our bus wave form preview when we lit this indicator. I find I sometimes have to re-listen to tracks watching console view or put console view on a second monitor to watch for PC Clip lights to blink. That's a tedious thing to have to do. Bus Wave Forms write over previous versions and change on zoomingThere are a couple of truths about the wave forms that get drawn in the buses that make bouncing a more useful tool for me. First, the graphics seem to over-write previous versions of the same wave form strangely if you listen repeatedly. And when zooming I'm never positive if I get the latest wave form or a wave form from before the last automation change. If you re-play the same section repeatedly at different zoom levels, it seems to fix the wave form to the current version, but this is more work than bounce to tracks to see the perfect and for-sure wave form. Second, any area of the track you haven't played through in this session will not have the wave form drawn in. Volume Automation and House NoiseI also use the volume automation to control fades at the end of tracks. I mix a lot of live recordings made in small bars or living rooms where there is audience noise, so I often fade out the instruments and then boost the already faded vocal mics to get some audience noise like clapping and cheering. Then I fade out the audience. It isn't so important how I fade out the audience. I just try to make sure I don't get any audience stuff that would embarrass anyone if their boss heard it (the danger of recording people who aren't aware of how hard you can boost those stage mics later :-)) -- like my double chin smiley? I notice you have volume automation on Buses. This I don't do that often. Sometimes I do it in post processing (usually because I want to boost some trivial thing in the crowd noise where the level in the track envelop itself is already at the top). For what it's worth, you can change the fade type in the fade clips using slow or fast too (although I almost leave it at linear). I do sometimes include master bus automation for FX, like changing the limiter settings, but to tell the truth, if I make any changes to the tracks themselves, I will re-visit the Master compression and limiting anyway, so knowing what it was at the time of the last bounce is only vaguely helpful. Again, I don't usually have bus automation. Navigator ViewI'm usually bouncing 1.5 - 3 hour long recordings ... song after song. Bouncing to tracks provides the addition of the visible tracks in the Navigator View. That way, I can easily find song number 17 by just counting my way along (I often put in markers with names if I have 40 songs, which my last project did). But I find that I often keep Navigator view in a regularly hit screen-set for exactly this purpose. I don't ALWAYS record 40 songs in a single project and bounce them out that way. For example, I have been taking the time in a recent 16 track bar recording to copy the tracks to other projects to split them up. I've been moving them 2 songs at a time for economy of scale. I find that having different projects every 2 songs is enough. :-) Then, if the project gets corrupted, I don't lose all the work for bouncing 4 hours of a 16 track project... I lose the last 2 songs. Before anyone jumps on the 'gets corrupted' line... the corruption comes from my by accidentally turning on OFFSET or playing with Audio Snap when I shouldn't. :-) AB Different versions of a takeAfter bouncing out the 40 tracks of my most recent project, I gave a copy to the artist (like that term, Susan?) and she asked what it might sound like if I re-bounced the project after a few tweaks to her EQ. So, I made the requested tweaks and bounced to another track BESIDE the original. Then I grouped the Solo buttons on the different versions of the mixed tracks so we could A/B the tracks after complete processing where the only appreciable difference was the EQ Change. This helped us know that the EQ Change was an improvement. I suppose I could have done this on the Master Bus and the Previously Bounced Track, but I would have to have the previously bounced track to do it, one way or another. SummaryIt's VERY interesting to me that senior folks here NEVER use Bounce to Tracks. It's a testament to the hardware and software of the day. This has been part of my workflow since the 90s when it frankly just made sense for any number of reasons (including processing power limitations and hardware re-use) and I've never stopped doing it. Edit: I didn't use Cakewalk in the 90s. I wasn't trying to claim that. The first Cakewalk version I installed was registered on 5/20/2006 - Home Studio 2002 version, and I wasn't really using Cakewalk until version 6. I used my first install just enough to know I wanted to investigate further. My workflow didn't originate in a modern DAW. Old habits tend to leak forward. Anyone still use the command line? :-) My methods may not really make sense in their original context anymore. Normalization - an example of something I can't give upThere are things I've tried to let go of and not been willing. Normalization is a great example. On my most recent project I used normalization to gain-stage the tracks for each song. During the live show, of course, the levels changed appreciably between the songs. For feeding the levels into the Pro Channels, I wanted them roughly hot, so I normalized to -3 DB before starting the mix. I kept instances of RMEs DigiCheck to monitor RMS and Spectral Analysis for the 4 tracks I was mixing. This helped me to adjust levels and compression appropriately on the different tracks. Then as I moved to next song, I just normalized it to -3 again and I didn't have too much adjusting to do to my various track FX. Speed of BounceI wanted to mention that I do it this way because it is how I can bounce out the mix the fastest. I have a full time job and a family, and I was able to bounce down 3 hours of music (3 CDs 1 hour each) in two weeks. I recorded it on 7/12/2013 and I delivered the final mix on Last Friday, 7/26/2013. That's fast IMHO. And I want to be fast, so I can do it again for someone else - or me! haha.
post edited by gswitz - 2013/07/28 08:30:44
StudioCat > I use Windows 10 and Sonar Platinum. I have a touch screen. I make some videos. This one shows how to do a physical loopback on the RME UCX to get many more equalizer nodes.
|
Jeff Evans
Max Output Level: -24 dBFS

- Total Posts : 5139
- Joined: 2009/04/13 18:20:16
- Location: Ballarat, Australia
- Status: offline
I prefer to add fades not even during mastering but after mastering. After I have mastered a track completely, if it needs a fade out I open the track up in an editor like Cool Edit Pro and apply the fade at the end of the track as the very last thing I do. It is the best place to do it because the signal to noise ratio remains highest because the fade is dropping any noise down as well as the music so you will never hear any noise in the fade using this approach. Fading in other areas prior to mastering especially in the mix can sometimes create a situation where the noise does not fade as much as the music does. Also a fade out in the premastered track might have strange consequences on the mastering processors. Fades are still are bit of a copout though, an ending is usually better! Buy hey sometimes they do work well and then it is a good time to do them.
Specs i5-2500K 3.5 Ghz - 8 Gb RAM - Win 7 64 bit - ATI Radeon HD6900 Series - RME PCI HDSP9632 - Steinberg Midex 8 Midi interface - Faderport 8- Studio One V4 - iMac 2.5Ghz Core i5 - Sierra 10.12.6 - Focusrite Clarett thunderbolt interface Poor minds talk about people, average minds talk about events, great minds talk about ideas -Eleanor Roosevelt
|
SteveStrummerUK
Max Output Level: 0 dBFS
- Total Posts : 31112
- Joined: 2006/10/28 10:53:48
- Location: Worcester, England.
- Status: offline
Great post Geoff, that's some very interesting stuff you do there. And it looks like I was trying to teach my grandmother to suck eggs
|
Guitarhacker
Max Output Level: 0 dBFS
- Total Posts : 24398
- Joined: 2007/12/07 12:51:18
- Location: NC
- Status: offline
I do the fades with envelopes in the tracks. That way, I can control with precision, the fades of the instruments. Because truth be told, I do not want everything to fade together. In some of my tunes, I have the piano chord fading last..... in others it is the fiddle note fading to silence last. In the example below, the bass is faded completely while the acoustic's are faded shortly thereafter. 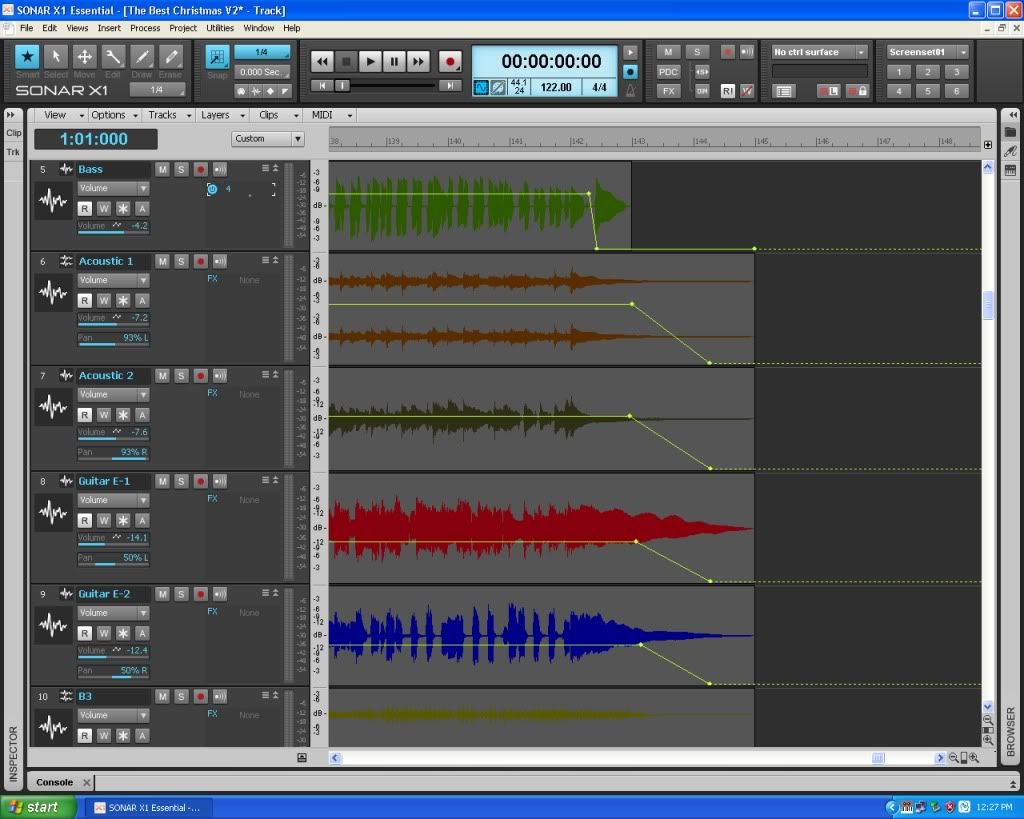
My website & music: www.herbhartley.com MC4/5/6/X1e.c, on a Custom DAW Focusrite Firewire Saffire Interface BMI/NSAI "Just as the blade chooses the warrior, so too, the song chooses the writer "
|
dotonemanband
Max Output Level: -87 dBFS
- Total Posts : 167
- Joined: 2012/05/27 18:17:21
- Location: Brantford Ontario Canada
- Status: offline
Thanks everyone for their input. Very helpful and interesting to discover different options available in Sonar.
|
konradh
Max Output Level: -42 dBFS
- Total Posts : 3325
- Joined: 2006/01/16 16:07:06
- Status: offline
Wow. Some complicated procedures just for a fade out.
Konrad Current album and more: http://www.themightykonrad.com/ Sonar X1d Producer. V-Studio 700. PC: Intel i7 CPU 3.07GHz, 12 GB RAM. Win 7 64-bit. RealGuitar, RealStrat, RealLPC, Ivory II, Vienna Symphonic, Hollywood Strings, Electr6ity, Acoustic Legends, FabFour, Scarbee Rick/J-Bass/P-Bass, Kontakt 5. NI Session Guitar. Boldersounds, Noisefirm. EZ Drummer 2. EZ Mix. Melodyne Assist. Guitar Rig 4. Tyros 2, JV-1080, Kurzweil PC2R, TC Helicon VoiceWorks+. Rode NT2a, EV RE20. Presonus Eureka. Rokit 6s.
|