• Computers
  • New Thunderbolt PC Build - documenting the build Day 3
2017/03/22 11:47:21
smallstonefan
As mentioned on another thread, I decided to build a new Thunderbolt PC. The parts are in and I'm ready to start!


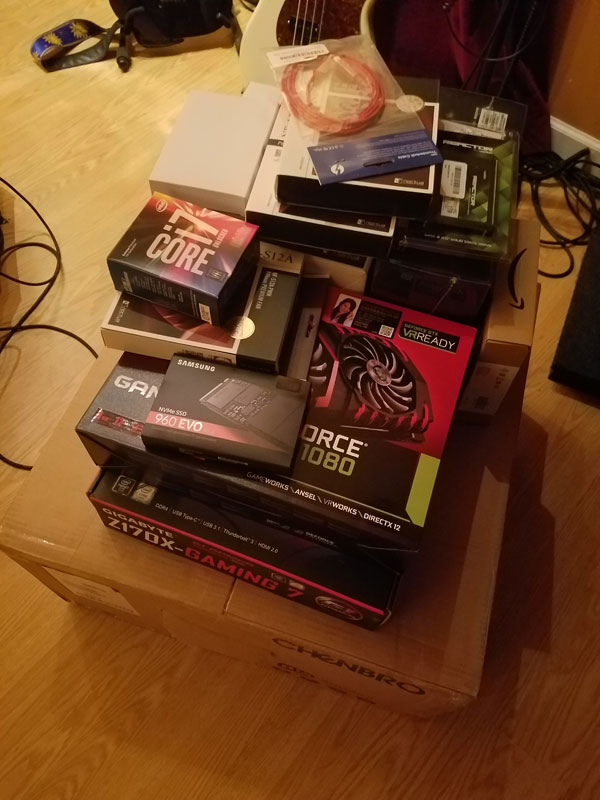
Here are the components:
  • 2 of Noctua NF-A8 PWM Premium 80mm PC Computer Case Fan
  • Mushkin REACTOR 1TB Internal Solid State Drive (SSD) 2.5 Inch SATA III 6Gb/s MLC 7mm MKNSSDRE1TB
  • 2M Premium Thunderbolt Cable – Red
  • Gigabyte ATX DDR4 Intel LGA 1151 SATA E (6Gbit/s) Motherboards
  • EVGA SuperNOVA 850 P2, 80+ PLATINUM 850W
  • MSI Computer GTX 1080
  • StarTech.com Thunderbolt 3 to Thunderbolt 2 Adapter
  • Noctua NH-D15 6 heatpipe with Dual NF-A15 140mm fans
  • Intel 7th Gen Intel Core Desktop Processor i7-7700K
  • Anker 3.5 inch Front Panel USB Hub
  • Noctua 120mm, Anti-Stall Knobs Design
  • G.SKILL F4-3000C15D-32GTZ TridentZ Series 32GB
  • Chenbro Rackmount 4U Server Chassis
  • 2 of Corsair Dual SSD Mounting Bracket 3.5" CSSD-BRKT2
Here's the approach I've taken so far:
 
1. Build a drive map. I bought a new M.2 drive module for the boot drive so I will be installing everything from scratch rather than imaging my drive. I also bout a 1TB SSD so I can consolidate a few of my existing USB3 SSD drives to one internal drive. I built a map of the old drives and the new drives so I know what is going where, and in what order I need to move things.
2. I exported by Programs and Features list of my DAW to get a list of everything installed. I then looked at all of the saved installs I keep and found some that were not listed in Programs and added them to the list. I also visually looked through my VST folders to find any plugins that were installed but not listed in the Programs list.
3. For all items I intend to install, I made sure I have the license info for every single one of them, and I contacted the few vendors that need to be involved manually (Sonarworks and Output primarily). 
4. I made sure I either had the latest installer or I got the web location for the current installer for everything in my list.
5. I picked the top 10 most important items to install and put them in order.
 
I did all of this in a spreadsheet and for anything I didn't have everything I needed for or was unsure, I flagged in red. When I was sure I had what I needed, I changed it to green. Now that all of the red is gone, I'm ready to start...
 
I am building this as an entirely new PC so I can keep my old one running and take my time with this new one. It sucks to be missing a computer and fighting technical issues or missing parts at the same time, so I intend to avoid that.
 
I'll take photos and any relevant notes and post as I go...
2017/03/23 02:20:57
timidi
Sounds great.
 
2017/03/23 13:41:35
smallstonefan

Day 1

OK, so I'm off and running! This was a slow day, just easing into the build in between other things around the house.
 
1. Here's the inside of the rack mount chassis I'm using. Seems well built but I'm surprised at how tiny all of the screws are. :)


 2. Mounted the power supply. There was a weird bracket that seemed to be for a smaller PSU, but removing a few screws from underneath allowed me to pull the bracket out.


3. The case came with a 120mm fan in the front. I remove the mounting piece for the fan and you can see it here...
 
 
4. I want to make this case as quiet as possible so I bought noctura fans. Here you can see I replaced the stock 120mm fan with a noctura fan. Notice the rubber mounting pylons instead of fan screws. I hadn't seen this before, but they worked here. The fan came with a quiet adapter and an extender. I intend to use the quiet adapter on all fans.


5. There were no case fans in the back, so I added two noctura 80mm fans. Due to location, I could not use the rubber mounting pylons for the fans, so I used traditional fan screws that came with the fans to mount them. Here you can see I attached the quiet adapter to the fans - I assume this just has some sort of resister since it slows the fans down. I've also attached the Y cable so both fans can feed from the same motherboard port, and I attached the extender that came with the fans. All of this is subject to change once the mobo goes in...


6. I installed a 2 port USB 3 panel in the bottom of the drive cage. Black on black doesn't make for much of a picture, but here it is... :)
 

2017/03/25 14:28:13
timidi
Must have forgot the thermal compound..:)
2017/03/25 17:23:35
Eddie TX
Hey James, thanks for posting your build progress. I'll be following your adventure. ;-)
 
I like your choice of Noctua fans. I used those in my rig, and I'm very happy with them. The "quiet adapter" is indeed a resistor that slows the fan speed, but you may want to adjust your speed settings within the controller so that the fans get enough juice to start spinning when booting up. Too little and they won't get going. Something I noticed with my setup, anyway. Good luck!
 
Cheers,
Eddie
 
2017/03/25 18:22:31
smallstonefan
Thanks for the tip Eddie! This will probably be a slow process as I'm only going to work on it as I'm interested (and have time). :) 
 
I do have day two photos to post...
2017/03/25 18:48:25
smallstonefan

Day 2

The stuff that makes me the most nervous - mounting the processor, cooling, and memory is now done.
 
1. I had to figure out where to put the motherboard mounting inserts. The case comes with multiple places to do this, for different types of boards.

 
2. The way I do this is I carefully lay the motherboard in the machine and I use a Sharpie to mark the mounting holes.


3. I'm pretty excited that I remembered I needed to mount the heat sync before putting the motherboard in the case! :) So I mounted the heat sync, the fan, and the memory before installing the motherboard.


Next steps will be to hook up the motherboard to the fans and front panel cables, then install the m.2 boot disk and graphics card...
2017/03/25 18:51:00
smallstonefan
timidi
Must have forgot the thermal compound..:)


:)
2017/03/26 17:00:48
smallstonefan

Day 3

Mostly some housekeeping stuff here - getting an M.2 drive mounted, hooking up the motherboard, and installing the GPU.
 
1. My first "oops" of the build. I really wanted to put the M.2 boot drive in the first position on the motherboard. However, I have learned that you can't easily do this once the cooler has been installed. I started to look for my offset screwdrivers but then I'm not sure I could have the M.2 drive at a steep enough angle to insert it anyway. You can see here where I wanted to put it. I'm really surprised the motherboard manual didn't cover this BEFORE the cooler portion, or at least have a warning.


It's not a catastrophe as I was able to put it in the second slot. This does disable the left most high speed PCIe port, but  that still leaves me enough ports to get my two UAD octo cards installed.


3. Next up was hooking the motherboard up. I won't post photos for all of the connections, but of interest is this weird plastic shell that lets you put the case connectors into and then slides into the motherboard. We'll see how well I followed the directions when I fire it up.


4. Next up, the graphics card. This baby is SWEET looking! I chose a 1080 because I am a gamer, and I went with the MSI because by all accounts it's the quietest 1080. The fact that it looks AWESOME with the red colors of the motherboard AND memory was a nice bonus!


5. Last thing for the day was a little case management using some zip ties to clean things up.

 
I did all of this yesterday - if things go well I will have this booted and installing Windows today...
2017/03/26 17:33:51
Rob[at]Sound-Rehab
Thanks for sharing all this detailed info. Makes excellent reading but it does scare me like s***. Pretty sure I'll have somebody build the next DAW for me.

Really curios how your thunderbolt experience will be!
© 2024 APG vNext Commercial Version 5.1

Use My Existing Forum Account

Use My Social Media Account